Growing Arabidopsis
Introduction
 There are many possible ways to grow Arabidopsis using
different composts, plant maintenance routines and seed collection systems.
Here we describe the protocols adopted at NASC with a few alternative
suggestions and below a link to the Horticulture Department of Purdue University, Indiana who have put together a comprehensive Arabidopsis growing methods page.
There are many possible ways to grow Arabidopsis using
different composts, plant maintenance routines and seed collection systems.
Here we describe the protocols adopted at NASC with a few alternative
suggestions and below a link to the Horticulture Department of Purdue University, Indiana who have put together a comprehensive Arabidopsis growing methods page.
Purdue University Growing methods page
There are also many ways to accidentally kill Arabidopsis at any stage in the process of sowing or growing it. We have collected a few of
our favourites in a cartoon.
Please feel free to use this cartoon wherever it might help arabidopsis users
NASC protocols
Compost
After trying out several compost mixes we have found a variety of commercially available composts that give very good results. Water control is important, so we recommend pre-mixed or home-mixed composts that include vermiculite. Our current compost is a pre-mixed compost that includes John Innes and perlite components.
Pest Management
For routine control of sciarid fly and thrips pupae, we currently use Hypoline m (Hypoaspis miles / Stratiolaelaps scimitus). The mites feed on sciarid fly larvae and thrips pupae. Adults live for several months and survive up to 50 days without food, making them ideal in situations of low pest populations. Additional information about this product can be found here: http://fargro.webshop.aphixsoftware.com/integrated-pest-management/select-a-bug-/sciarid-fly.html. We recommend to apply the mites as soon as the seeds have been sown. The use rate is approx. 100 mites per square meter.; a 25,000 mites tube is enough to cover 250-300 12-cm pots.
Tobacco 'bombing' with nicotine shreds can be used to clear greenhouse space of insect pests quite efficiently BUT it is important to bear in mind that this will almost certainly make some or all of your arabidopsis plants temporarily infertile. For this reason, crosses or silwet / vacuum transformations should not be attempted for 1-2 days preceding, or for 1-2 days after tobacco treatment.
To control mildew and some other fungal infections, general plant cleanliness: i.e. prompt removal of dead plant material and regular replacement / cleaning of the growing area is recommended.
Sowing
- Fill your pots with compost (clay, plastic or polystyrene - we use 5 inch diameter disposable plastic pots for efficiency). Settle the soil by giving the pots a sharp tap and compress very lightly to give a firm bed.
- Sow the seed onto the surface of the compost by scattering them carefully from a piece of folded card (for even distribution and ease of handling for very large volumes of seed it can be useful to mix them with clean sand).
- Place the pot in a flower sleeve then wrap the sleeve around the pot (effectively forms a mini propagator for each pot) then place them in a tray and transfer to a cold (4oC) dark room for 2-3 days - this stratification improves germination rate and synchrony. Traditional plant propagators can be used in place of the flower sleeves.
- Transfer to the greenhouse. Our Greenhouse is maintained
as close as possible to 22oC (18-28oC) and has a
24h photo-period provided by 10,000 lux globe (Son-T) lighting. Alternatively,
Arabidopsis can be germinated and grown for part, or all, of it's life
cycle in a growth room.
For standard lines we do not find it necessary to supplement the growth medium although a rich medium can speed up development.
Pots are placed on raised benching which is watered on an automated ebb and flow (drench and drain) system
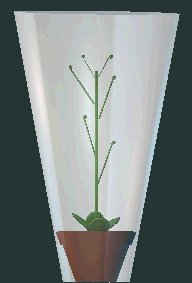
When the seeds have germinated the sleeves are unfurled to form a 'personal propagator' figure 1. which keeps the plants of one line isolated from neighbouring plants (ensuring that absolutely no cross-pollination can occur), and provides support to reduce sprawl and conserve growing area space.
The pots are then watered from below. If any shoots reach above the lip of the sleeve, they can be trimmed with large scissors efficiently in one cut. - Plants are watered until at least 90% of the seed pods have dried completely and then the plants are allowed to dry slowly in situ for maximum viable seed production (the sleeves physically prevent cross-contamination by pod-shatter).
Stratification (Breaking seed dormancy)
For many lines this is not necessary. However, fresh or poorly stored seed will normally
germinate more uniformly (synchronise) if placed in the cold (4oC)
for 1-5 days once sown, i.e. they are cold treated as they imbibe. Over
this range, the period of stratification correlates to the degree of uniformity.
Vernalisation is a different process, whereby plants may be
induced to flower earlier as the result of an extensive cold period during
the initial vegetative growth period.
Plant isolation and staking:
Although Arabidopsis is predominantly self-fertilising it is a good idea to plant material far enough apart to prevent flowers from different lines coming into contact with one another or preferably isolate the plants from each other using a system such as the plastic sleeves, mentioned above, or the commercially available Aracon sleeves. If for some reason you need access to the plants while they are growing it may not be practical to contain the plants inside an isolation system (e.g. if you are making crosses) the plants may therefore require staking. Stakes can be made from commercially available garden wire and pea rings or alternatively: plastic rods (resistant to bleaching!) and disposable wire bag ties.
Harvesting
Because we grow the plants inside plastic sleeves this makes
seed collection straightforward. When the plants are completely dry you can:
Cut off the pot and dispose of it.
Massage the outside of the bag to separate the seeds from the dry vegetative material.
Pour the seed / chaff mix through a nylon mesh (see below) to remove the chaff.
Transfer to moisture-porous photography 'negative' bags for further drying.
Storage
Seeds will remain viable for at least two years if stored in a dry atmosphere at room temperature.
For medium term storage we place in a controlled environment maintained at 15°C, 15% relative humidity
(the seeds will dry to 5-6% moisture content under these conditions).
For long term storage we dry the seeds to ~5-6% water content in the controlled environment described above
and then place them in Sarstedt (or equivalent moisture impermeable) screw top 1ml vials in standard non-frost-free chest freezers at -20C. We do not store the seed under individual desiccant.
Following our move in 2001 to our new location at Sutton Bonington, we have moved our seed stores out of the
bespoke cabinets that we had previously used, and into humidity and temperature controlled rooms. This allows
us to both store and handle seeds in an atmosphere conducive to long term viability.
Our cabinets utilise an externally mounted heated and rotating drying drum with independent compartments of
hygroscopic gel. The dry gel extracted the moisture from the cabinets and was then dried by heating with
moist air vented to the outside of the cabinet. The current room works on a similar heating and external
venting mechanism.
Most commercial 'stand-alone' dehumidifiers reduce humidity to a maximum of 20% which should be a reasonable
environment for medium term storage of seed.
Informal advice on storage for the beginner / small lab
The basic requirement is to keep them:
- dry;
- cool if possible;
- dark if possible.
Dry is the most important. We dry seed to 15%RH (5% moisture content) which is more than you will need for short term (e.g. 3 years storage in the normal grant). If you need to store them for longer than that, consider donating them to a stock centre near you.
Please do NOT put the seeds in a fridge - this is frequently too damp (take a look in the average student fridge after a holiday) and will cause loss of germination unless you keep the seed in a sealed box with desiccant.
The seed will store for several years without a perceptible loss in germination rate if you keep them in a normal dry area (i.e. not near a sink or air conditioner) preferably in a non-air-tight box (unless you have desiccated them) and out of direct sunlight away from heaters.
To help to reduce moisture, you should make sure that seed are DRY before storing (i.e. no green seeds). It is best to dry seed on the plant, and then after collecting, put them in a porous bag (paper will do, but we use photographers envelopes) and perhaps put them in a fume cupboard or on desiccant. PLEASE be aware that seed are very static, so do not dry them in open top eppendorfs or even eppendorfs with holes in the lid as there will a very high risk of cross contamination.
If you want to keep the seed for decades/centuries, then you should dry them down and then store them in a FROST-FREE freezer (these naturally have low humidity, so the quality of the eppendorf is less critical) -OR- in a normal freezer with rubber-sealed tubes.
Also, if you are VERY interested in seed storage then please see our collaborative paper with Kew / Wakehurst:
Fiona R. Hay, Andrew Mead, Kirstine Manger and Fiona J. Wilson. (2003) One-step analysis of seed storage data and the longevity
of Arabidopsis thaliana seeds. J. Exp Bot. 54: 384, pp993-1011. Link to Article.
As for sieving the chaff away from seeds, we use nylon mesh. Put the seeds on the mesh and lift away the chaff. The original mesh that we used was bridal veil, but we now use insect netting for cots from toys'r'us which is cheap and has a perfect mesh size. Metal meshes (sieves) also work, but are prone to carriage of seed between samples and hence cross contamination - similarly, white nylon mesh is best to check the material for seed contamination and for rigidity (muslin is not suitable).